|
|
Shirt Sleeve Plackets
Sleeves which close at the wrist with a snugly-fitting cuff require an opening to insert the hand.
The sleeve is slashed and the slash is finished with a placket of some type before the underarm seam is sewn. Cuffs are attached after the underarm seam is sewn.
Examples of shirt sleeve plackets

From left to right:
1) man's plain placket; 2) man's triangular placket; 3) woman's triangular placket; 4) continuous sleeve placket
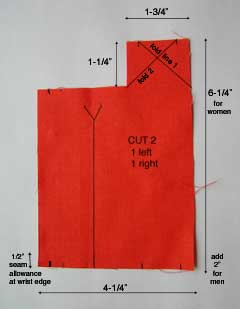
Free pattern for a decorative shirt-sleeve placket
Click on the image to go to a printable page with the pattern at actual size.
This is the pattern used in examples #2 and #3 above.
It is also the pattern used in my Durham College Sewing 2 class, with sewing instructions given below. |
 |
[Click on the photos to see a larger image]
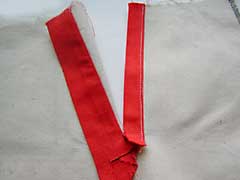
1. Prepare the placket
 |
- press the seam allowances on both sides of the placket to the wrong side
- open up the seam allowance on the long side again and press the upper extension in on fold line #1
|
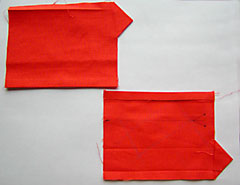 |
- fold again on fold line #2, over top of the previous fold; press so that the second folded edge is just hidden by the first [you should have formed a perfectly symmetrical triangle on the upper extension]
- press the long side seam allowance in again, covering the cut edge of the triangular fold
|
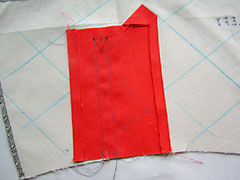
2. Stitch the placket to the sleeve
- lay the right side of the placket on the wrong side of the sleeve; be sure that you are placing a Left Sleeve placket on a Left Sleeve and a Right Sleeve placket on a Right Sleeve [the shorter side of the placket should be closest to the underarm edge]
- align the cutting line notches and the two dots on both pieces
- use a short stitch length to sew the placket to the sleeve by stitching on the stitching line [1/4” from the cutting line], stopping and pivoting exactly on the dots
|
 |
3. Cut the sleeve opening
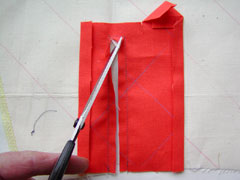 |
- cut the sleeve and placket open on the cutting line, angling into the corners from about 1/2” before the top
- clip into the corners right up to, but not through the stitching
|
4. Turn the placket to the right side
- first, on the wrong side, press the placket over the seam allowances, toward the opening
- fold the placket piece through the opening to the right side of the sleeve
- finger-press the upper seam to be sure it lies flat [if not, you need to correct your clipping into the corners]
|
 |
5. Edge stitch the under placket to the sleeve
 |
- position the pressed edge of the under placket so that it just covers the previous stitching line
- press; [there will be a pleat in the placket fabric above the corner of the opening]
- edgestitch in place
|
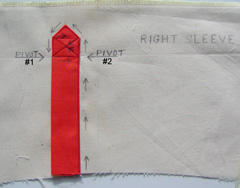
6. Stitch the upper placket to the sleeve
- position the pressed edge of the upper placket just over the previous stitching line
- press carefully to maintain the triangular shape of the upper placket
- use pins or a fabric marker to indicate exactly where the upper dots of the slashed opening are (these become the pivot points for the next step)
|
 |
- edgestitch the upper placket in place: the arrows indicate the stitching direction
> start at the wrist edge, stitching up and around the triangle to Pivot #1
> stitch across the placket to Pivot #2
> angle up to the bottom of the triangle
> pivot and stitch straight across to the other side
> angle down to Pivot #1 and stop exactly on the previous stitching
|
 |
Inside view of the completed sleeve placket
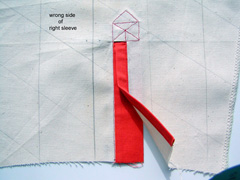 |
- the styled topstitching encloses all the raw edges and finishes the opening on the wrong side of the sleeve
- note how the upper placket overlaps the underplacket: This allows the cuff edges to overlap so they can be buttoned
|
|
